背景
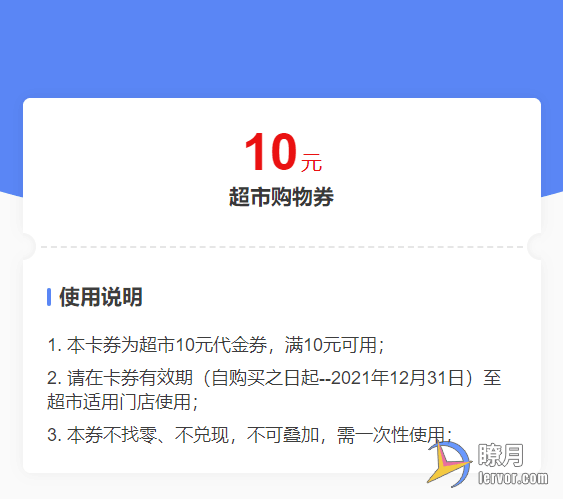
开发前端项目,特别是商城项目,难免会涉及优惠券的开发,而且产品和客户对优惠券样式的要求又千变万化。就比如今天产品和 UI 给了个设计图,需要实现如下图所示的左右镂空的挖孔且带阴影效果的优惠券。

分析和实现
这种需求最简单的方式就是直接让 UI 切图,使用背景图片,但是在不同分辨率的兼容性特别是同时支持 PC 端和 C 端上表现的不是那么好,且图片加载期间页面体验也不佳。因此我考虑直接采用 CSS 来实现。
如果不需要阴影效果的话,比较简单,可参考之前的文章:纯 CSS 实现优惠券透明圆形镂空打孔效果。本文也是在此基础上增加阴影效果的实现。先看代码:
HTML 代码:
<view class="page">
  <view class="page-top">
  </view>
  <view class="coupon">
    <view class="coupon-top">
      <text class="coupon-top-value">10</text>
      <text class="coupon-top-title">超市购物券</text>
    </view>
    <view class="coupon-middle">
      <view></view>
    </view>
    <view class="coupon-bottom">
      <view class="card-title">
        <text>使用说明</text>
      </view>
      <view class="card-content">
        <p>1. 本卡券为超市10元代金券,满10元可用;</p>
        <p>2. 请在卡券有效期(自购买之日起--2021年12月31日)至 超市适用门店使用;</p>
        <p>3. 本券不找零、不兑现,不可叠加,需一次性使用;</p>
      </view>
    </view>
  </view>
</view>
SCSS 代码:
page {
  background-color: #FAFAFA;
}
.page {
  .page-top { // 参考上一篇文章圆弧效果实现
    width: 140%;
    height: 300rpx;
    background: #5A86F5;
    border-radius: 0 0 50% 50%;
    margin-left: -20%;
  }
  .coupon {
    margin: 0 30rpx;
    display: flex;
    flex-direction: column;
    margin-top: -170rpx;
    &-top, &-bottom {
      background: #FFFFFF;
      box-shadow: 0px 0px 20rpx 0px rgba(4, 0, 0, 0.06); // 上下两块阴影效果
      box-sizing: border-box;
    }
    &-top {
      height: 180rpx;
      border-radius: 10rpx 10rpx 0 0;
      display: flex;
      flex-direction: column;
      align-items: center;
      &-value {
        font-size: 68rpx;
        font-weight: bold;
        color: #EA1111;
        margin-top: 34rpx;
        &:after {
          content: '元';
          font-size: 28rpx;
          font-weight: normal;
          margin-left: 4rpx;
        }
      }
      &-title {
        font-size: 28rpx;
        font-weight: bold;
        color: #383838;
      }
    }
    &-bottom {
      flex: 1;
      padding: 10rpx 32rpx 30rpx;
      border-radius: 0 0 10rpx 10rpx;
      .card-title {
        margin: 20rpx 0;
        display: flex;
        align-items: center;
        &:before {
          content: ' ';
          position: absolute;
          width: 6rpx;
          height: 24rpx;
          background: #5A86F5;
          border-radius: 3px;
        }
        text {
          height: 40rpx;
          line-height: 40rpx;
          margin-left: 16rpx;
          font-size: 28rpx;
          font-weight: bold;
          color: #3D3D3D;
        }
      }
      .card-content {
        font-size: 24rpx;
        color: #3D3D3D;
        p {
          padding: 6rpx 0;
        }
      }
    }
    &-middle {
      height: 36rpx;
      position: relative;
      overflow: hidden;
      background: #FFFFFF;
      display: flex;
      view { // 中间虚线
        position: absolute;
        left: 24rpx;
        right: 24rpx;
        top: 18rpx;
        border-top: 1px dashed #E6E6E6;
        z-index: 9;
      }
      &:before, &:after {
        content: '';
        position: absolute;
        width: 36rpx;
        height: 36rpx;
        border-radius: 50%;
        box-shadow: 0px 0px 12rpx 0px rgba(4, 0, 0, 0.06)inset;  // 挖孔阴影效果
        background: #FAFAFA; // 背景颜色跟页面背景色设置相同
        box-sizing: border-box;
      }
      &:before {
        left: -18rpx;
      }
      &:after {
        right: -18rpx;
      }
    }
  }
}
实现原理:
把优惠券拆成上中下三块,中间那块通过构造与底色一样的半圆进行覆盖,单独给上下部分以及左右半圆进行阴影处理,最终效果图如下:

带边框效果实现:
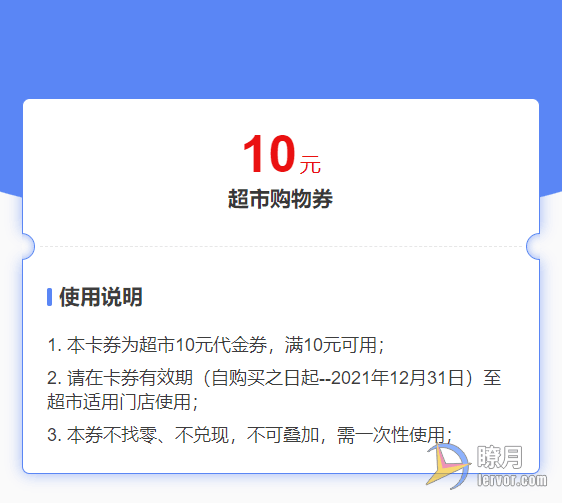
实现完阴影效果,再来实现带边框效果就不难了,原理一样,给上部分设置上边框、左边框、右边框,下部分设置下边框、左边框、右边框,两个半圆也设置同样的边框。上面的 CSS 中需要修改的代码片段如下:
.coupon {
  &-top, &-bottom {
    box-shadow: 0px 0px 20rpx 0px rgba(90, 134, 245, 0.6); // 阴影效果,不需要可删除,可根据需要调节颜色、透明度和大小
  }
  &-top { // 上部分设置上边框、左边框、右边框
    border-top: 1px solid #5A86F5;
    border-left: 1px solid #5A86F5;
    border-right: 1px solid #5A86F5;
  }
  &-bottom { // 下部分设置下边框、左边框、右边框
    border-bottom: 1px solid #5A86F5;
    border-left: 1px solid #5A86F5;
    border-right: 1px solid #5A86F5;
  }
  &-middle {
    &:before, &:after { // 中间两个半圆也设置同样的边框
      box-shadow: 0px 0px 12rpx 0px rgba(90, 134, 245, 0.6)inset; // 阴影效果,不需要可删除,可根据需要调节颜色、透明度和大小
      border: 1px solid #5A86F5;
    }
  }
}
最终效果图如下:

相关文章
版权属于:瞭月
本文链接:https://www.lervor.com/archives/251/
版权声明:本文为瞭月原创文章,转载请附上原文出处链接和本声明。
7 条评论
太牛了,学到了
两个圈被你玩得这么6~~
中间两个半圆 点睛之笔!
可以有